As always, when I'm doing something new, I scour Pinterest for ideas.
I was looking for nursery DIY projects and came across some cool closet dividers for baby clothing.
The problem with all the ones I found, was that they had to be purchased (no thank you!), or they weren't adjustable (i.e. had a permanent 0-3 months stamped across). This doesn't make sense to me because they are only going to be in 0-3 month clothes for 3 months, IF they don't grow fast!
I decided to make my own dividers with chalkboard imprints so that I can change the sizes down the road to 2T, 3T, etc.
So here's my tutorial:
I started at Michael's where you can get the following:
scrapbook paper of your choice
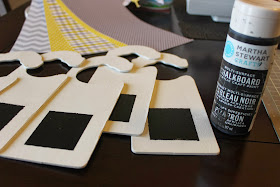
doorknob hangers
chalkboard paint
spraypaint (if desired)
mod podge
I choose yellow and gray colours to match my nursery:
I started by spraypainting the doorhangers white.
(well actually, the husband did that so that his pregnant wife could safely avoid the fumes).
I measured out squares and painted inside the squares with chalkbaord paint.
I stayed 3/4 of an inch away from the edge for the squares.
Then I traced a cut the scrapbook paper to fit the front and back of the hangers.
An x-acto knife works best for cutting the chalkboard square out.
Then I mod podged the paper to the hangers doing one side, letting it dry, and then the other side.
When the mod podge was dry, I stamped different animals using various Close to My Heart scrapbooking stamps.
Next, I used workable fixatif (from Michael's again) to stiffen the cardstock that I stamped onto, and to make sure that the ink wouldn't run later on.
It sprays on like spray paint and dries very quickly.
Then, to give the animal pictures a 3D effect, I used 3D pop-up tape to adhere them - you can find this at most dollar stores for cheap!
I also used crazy glue to ensure that the pieces would be stuck on for the long haul.
And here is the finished product :)
They perfectly match our neutral gray and yellow nursery!
And they fit perfectly in the closet to separate the few clothing items we have so far :)
Hope you enjoyed the tutorial!
Please comment if you have any questions or suggestions!
{xoxo}


They look fabulous!! Does the chalk rub off on the clothes if they bump it??
ReplyDeleteThanks! The chalk did fade after a month or so. I just wrote it on again :)
Delete